Debugging #WebApps on #iOS is a super easy if you have a Macbook. If you’re on #Linux, it’s not. This post documents how I got around that limitation by using #OpenSource utilties and tools.
Category: Linux
Categories
Pruning Pestering Prompts from Pop!_OS
Alliteration always amuses and accrues an abundance of amiable affluence.
Categories
AMD Annoyances
Frustrations encountered with AMD Pro drivers on Pop!_OS.
#linux #amd
I’ve been writing on this blog for nearly 9 years and I’ve learned so much since I started. The style and the content have come a long ways and I cringe every time I read old posts thoroughly enjoy seeing how I’ve grown as a developer. I’ve interacted with people that I never would have had the chance to otherwise. It’s been a wonderful learning experience.
While my intentions have always been for this site to exist as a sort of journal/wiki/knowledgebase/playground, I’ve always secretly wanted to become a billionaire tech influencer. And now you can help me achieve that goal by buying my merchandise!
BUY! BUY! BUY!
By purchasing merchandise from my shop, you can support this site financially, by giving me real money that you’ve earned for your “hard work.” While donations are always appreciated, I understand that you may want something in return; something tangible, something you can see and smell, something to keep you comfortable while you cry yourself to sleep. And since nobody actually donates to strangers on the internet, I opened a shop.
All of the designs are completely original and there are many, many more to come. The pricing is affordable for all budgets and will only expand with more options. Be sure to check posts here often by following the social media channels or the RSS feed. There may just be coupon codes hidden in future posts 😉.
So if you’re ready to showcase the fact that you know what HTML is and like the look of monospaced fonts, then you should go checkout the new closingtags merch shop. Once you’ve got the closingtags swag (closingswag 🤔), be prepared to have people you barely know ask if you “work with computers” or to tell you about their genius new app idea.
Don’t forget to buy, buy, buy!
Update: As evident by the comments on this post, it seems this method may not work for all installs. The issue seems to be with SMB shares. This post outlines the process with NFS shares. Thanks to Alex in the comments for these findings. If you find other issues or learn why this is the case, leave a comment below or fill out the contact form.
When ever I run into an issue during GNU/Linux server administration, 9 times out of 10, it’s due to permissions. By this point, it’s only frustrating when I realize that I didn’t check the permissions first. Since starting my homelab years ago, one issue that has plagued me has been giving write access to my unprivileged LXC containers in a shared storage.
I could possibly sidestep this problem by starting a VM but I like containers. Why? Containers are great because they reduce resources consumed, segment logic, and are quickly reproduced. This is all accomplished by using existing features of the Linux kernel and its user space. The host machine already has a kernel (unlike a VM which is given its own kernel), so when running a container, the host machine kernel is shared with the container and is managed by the host as another user on the system. By design, unprivileged LXC containers (henceforth known as unpriv LXC) have no permissions on the host machine. They are relegated to the nobody user and nogroup group. This ensures that if an attacker were to compromise the container, they would have no permissions on the host machine. That’s all well and good, but what if you want to share storage across your unprivileged containers? There are presumably ways that you can punch holes in AppArmor but Proxmox does in fact, make it simple.
In my example, I have an unpriv LXC running Plex. I don’t want this container to be able to do anything on the host but I would like it to be able to read and write from a shared media folder on my network.
Mounting NFS
The first step, is making sure the Proxmox host has access to the Network File Share (NFS). This is incredibly simple via the GUI. Under Storage View, click the Datacenter, then click Storage. Click the “Add” button and select the appropriate storage option. In your case, it may be SMB/CIFS or Directory but in my case, it’s NFS.
** Update: As noted by commenters, this process does not work for SMB shares. **
The ID will be the name of the storage, the server is your NFS IP address, export is the NFS path, and the content is what Proxmox will use this storage for.
Bind Mount
Once our host has access to the NFS, we need to give the container access to that data via a bind mount. A bind mount is a folder on the host that is mapped inside the container. To create the bind mount, open the Proxmox CLI, and run
pct set 100 -mp0 /host/shared_dir_location,mp=/path/in/container
pct is the Proxmox Container Toolkit
set tells pct we’re going to set an option
100 is the container ID we’ll be working on
-mp0 is the name of the mount point
the first path listed is the directory on your host you’re attempting to share with the container
,mp=/path is the path where we want that directory mounted within the container
Permissions
From here, open the Proxmox GUI (web interface) and within the Server View, click Datacenter > Permissions > Groups.
Permissions management for a Proxmox Datacenter
After that, click the “Create” button to make a new group permission. Give it a name like “shared_file_access” and a description so you know what it does. We’ll also go on to select “Roles” below “Groups” and create a new role. Give the new role a name like “DataAccessRole” and assign it the storage related privileges, which are the ones that start with “Datastore.” as well as “Pool.Allocate” and “Pool.Audit.”
Once that’s complete, we can select our container from the server list on the left, navigate to it’s permissions, and click “Add” to give it our group permission and the role. We’ll want to do the same thing for the storage point we mounted earlier on the host. That can be found under Data center > Storage. Select your storage point, and navigate to the permissions of it. From there, give it the same permissions you gave to our container.
If your storage location is properly mounted inside of Proxmox, your unpriv LXC should now be able to read and write to the location we mounted earlier! You can test this by opening a terminal in your unpriv LXC, navigating to the bind mount point, and attempting to create a file there eg. touch test.txt.
Comment below with how well this worked for you, and if you liked this post, share it around.
Categories
The Hacker Hotkey
I had plans to do an in-depth post about web application security this month but some major changes in my life made it difficult to finish the required research. Instead, I’m going to share something a little different.
Presenting, the Hacker Hotkey, the badge for Kernelcon 2021!
Hacker Hotkey on the left in a 3D printed case that a friend gave to me. Notice the custom sticker that perfectly fit the key caps.
Since Kernelcon 2021 was virtual again this year, the organizers wanted to do something different so they hosted a live hacking competition where viewers could vote on the challenges contestants were issued. The Hacker Hotkey came pre-programmed to open links to the event stream, the Discord chat, and cast votes. They’re currently still available for sale so grab one while you can and get yourself a handy-dandy stream deck!
As always, the organizers of Kernelcon knocked it out of the park but I’d be lying if I said I didn’t spend most of the time tinkering with my Hacker Hotkey. I thought I’d share my code and configuration here.
Edit (5/7/21): In order to get better support for media keys and contribute to the kernelcon/hacker-hotkey project, I’ve removed the old repository and updated it with one that no longer has my custom keybindings. Stay tuned, as this could be interesting!
All I really did was fork the official Kernelcon git repo and add in my own commands and keyboard shortcuts. I don’t do any streaming (for now) so my tweaks were meant to be simpler. For instance:
key 1 opens up a link to my personal cloud
key 2 starts OBS with the replay buffer running
key 3 is supposed to save the replay buffer to a file but I couldn’t get that to happen without setting a keyboard shortcut in OBS Studio (Ctrl + F8). I ran into a strange issue where the Hacker Hotkey will send those exact keystrokes to the system, but OBS Studio doesn’t recognize it unless OBS has focus. Loads of good that does me when I want to save a replay while I’m gaming! But weirdly enough, it works just fine when using the actual keystrokes on my keyboard. I’ll keep tinkering at it and hopefully get something better working.
key 4 uses gnome-screenshot to take a screenshot of the window that’s in focus and save that to my ~/Pictures directory
I wanted to set one key to toggle mute on my microphone, one to toggle my camera, another to pause/play music, and the last to move to the next song, but to get that working, I ended up having to set keyboard shortcuts within GNOME. That’s fine, but I can just use those keyboard shortcuts instead of the Hacker Hotkey so it’s doesn’t make a lot of sense. I also wanted the hotkey to be portable so that I could plug it into another system and keep that functionality and this way does not achieve that.
If you have any ideas about how I can fix this, or get my keyboard shortcuts to at least be portable via my dotfiles, leave a comment. I’m a little out of my depth with Arduino development but hey, it’s a fun learning opportunity
Edit (5/14/21): My repository now has support for media keys which makes toggling the play/pause of your system audio much simpler. This was achieved by swapping out the standard keyboard library with the NicoHood/HID library. See my pull request for more information.
My new keybindings follow like so:
key1 – open link to my cloud
key2 – start OBS with replaybuffer running
key3 – key binding set in OBS to save replay buffer (still not working unless OBS has focus)
key4 – take a screenshot using gnome-screenshot -w
key5 – print an emoticon and hit return
key6 – mic mute commands
key7 – MEDIA_PLAY_PAUSE
key8 – MEDIA_NEXT
Categories
.dotfiles
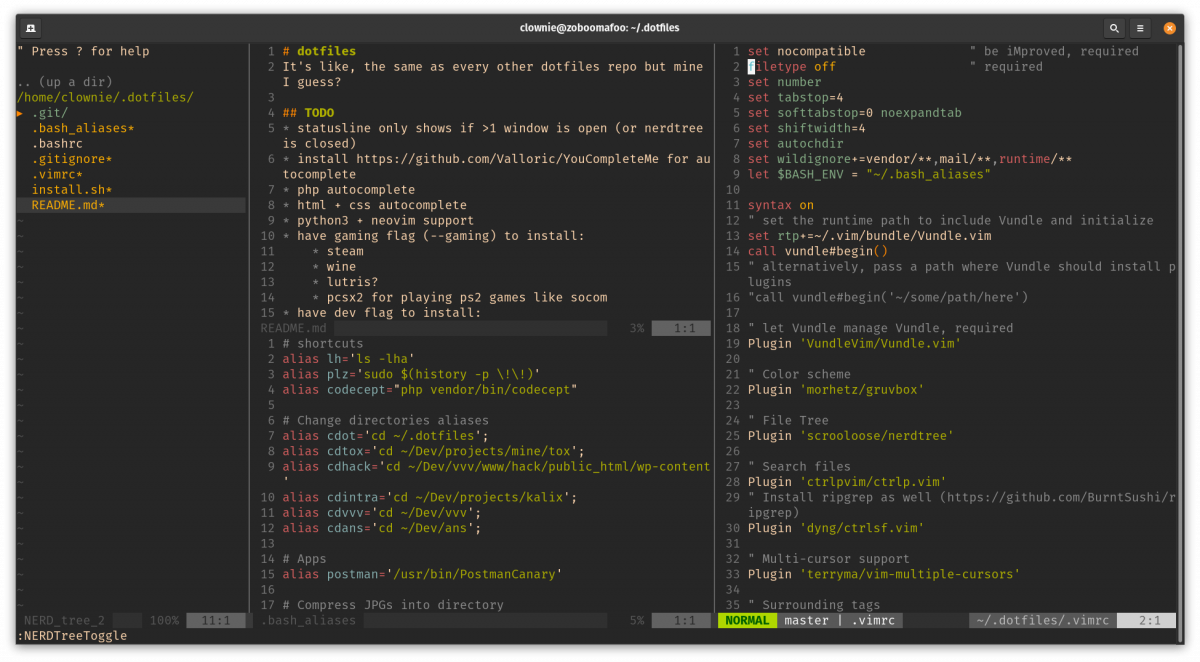
Purchasing a new computer is all fun and games until you have to set it up. You’ve just opened up your brand spanking new machine and you want to play with it, but you can’t do that until you get everything you need installed. What do you do if you’ve just installed your favorite GNU/Linux distribution when a shiny, new one comes along? You were finally getting comfortable and the last thing you want to do is fight through the hassle of setting up your environment again.
Instead of sloshing through the installation of all those dependencies, you can take a little bit of time to setup a .dotfiles repository. What are .dotfiles? They’re those hidden files in your home folder that manage your profile configuration. You don’t need all of them, but a few can go a long ways. Take a look at mine. Whenever I’m setting up a new machine, the first thing I do is install git. From there, I can pull down my version controlled configuration, and be up and running in minutes. Let’s do a breakdown of each file.
.bash_aliases
# shortcuts
alias lh=’ls -lha’
alias plz=’sudo $(history -p \!\!)’
alias codecept=”php vendor/bin/codecept”
# Change directories aliases
alias cdot=’cd ~/.dotfiles’;
alias cdtox=’cd ~/Dev/projects/mine/tox’;
alias cdhack=’cd ~/Dev/vvv/www/hack/public_html/wp-content’
alias cdintra=’cd ~/Dev/projects/kalix’;
alias cdvvv=’cd ~/Dev/vvv’;
alias cdans=’cd ~/Dev/ans’;
# Apps
alias postman=’/usr/bin/PostmanCanary’
# Compress JPGs into directory
alias compress=’mkdir compressed;for photos in *.jpg;do convert -verbose “$photos” -quality 85% -resize 1920×1080 ./compressed/”$photos”; done’
As you can see, keeping useful comments in your .dotfiles can make maintenance easier. You’ll notice a few aliases that I have for frequently used commands, followed by a few more aliases that take me to frequently accessed directories. Lastly, you’ll notice a familiar command I use when compressing images.
.bashrc
# ~/.bashrc: executed by bash(1) for non-login shells.
# see /usr/share/doc/bash/examples/startup-files (in the package bash-doc)
# for examples
# If not running interactively, don’t do anything
case $- in
*i*) ;;
*) return;;
esac
# don’t put duplicate lines or lines starting with space in the history.
# See bash(1) for more options
HISTCONTROL=ignoreboth
# append to the history file, don’t overwrite it
shopt -s histappend
# for setting history length see HISTSIZE and HISTFILESIZE in bash(1)
HISTSIZE=1000
HISTFILESIZE=2000
# check the window size after each command and, if necessary,
# update the values of LINES and COLUMNS.
shopt -s checkwinsize
# If set, the pattern “**” used in a pathname expansion context will
# match all files and zero or more directories and subdirectories.
#shopt -s globstar
# make less more friendly for non-text input files, see lesspipe(1)
[ -x /usr/bin/lesspipe ] && eval “$(SHELL=/bin/sh lesspipe)”
# set variable identifying the chroot you work in (used in the prompt below)
if [ -z “${debian_chroot:-}” ] && [ -r /etc/debian_chroot ]; then
debian_chroot=$(cat /etc/debian_chroot)
fi
# set a fancy prompt (non-color, unless we know we “want” color)
case “$TERM” in
xterm-color|*-256color) color_prompt=yes;;
esac
# uncomment for a colored prompt, if the terminal has the capability; turned
# off by default to not distract the user: the focus in a terminal window
# should be on the output of commands, not on the prompt
#force_color_prompt=yes
if [ -n “$force_color_prompt” ]; then
if [ -x /usr/bin/tput ] && tput setaf 1 >&/dev/null; then
# We have color support; assume it’s compliant with Ecma-48
# (ISO/IEC-6429). (Lack of such support is extremely rare, and such
# a case would tend to support setf rather than setaf.)
color_prompt=yes
else
color_prompt=
fi
fi
# Add git branch if its present to PS1
parse_git_branch() {
git branch 2> /dev/null | sed -e ‘/^[^*]/d’ -e ‘s/* \(.*\)/(\1)/’
}
if [ “$color_prompt” = yes ]; then
PS1=’${debian_chroot:+($debian_chroot)}\[\033[01;32m\]\u@\h\[\033[00m\]:\[\033[01;34m\]\w\[\033[01;31m\] $(parse_git_branch)\[\033[00m\]\$ ‘
else
PS1=’${debian_chroot:+($debian_chroot)}\u@\h:\w $(parse_git_branch)\$ ‘
fi
# If this is an xterm set the title to user@host:dir
case “$TERM” in
xterm*|rxvt*)
PS1=”\[\e]0;${debian_chroot:+($debian_chroot)}\u@\h: \w\a\]$PS1″
;;
*)
;;
esac
# enable vi shortcuts
set -o vi
# enable color support of ls and also add handy aliases
if [ -x /usr/bin/dircolors ]; then
test -r ~/.dircolors && eval “$(dircolors -b ~/.dircolors)” || eval “$(dircolors -b)”
alias ls=’ls –color=auto’
#alias dir=’dir –color=auto’
#alias vdir=’vdir –color=auto’
alias grep=’grep –color=auto’
alias fgrep=’fgrep –color=auto’
alias egrep=’egrep –color=auto’
fi
# colored GCC warnings and errors
#export GCC_COLORS=’error=01;31:warning=01;35:note=01;36:caret=01;32:locus=01:quote=01′
# some more ls aliases
alias ll=’ls -alF’
alias la=’ls -A’
alias l=’ls -CF’
# Add an “alert” alias for long running commands. Use like so:
# sleep 10; alert
alias alert=’notify-send –urgency=low -i “$([ $? = 0 ] && echo terminal || echo error)” “$(history|tail -n1|sed -e ‘\”s/^\s*[0-9]\+\s*//;s/[;&|]\s*alert$//’\”)”‘
# Alias definitions.
# You may want to put all your additions into a separate file like
# ~/.bash_aliases, instead of adding them here directly.
# See /usr/share/doc/bash-doc/examples in the bash-doc package.
if [ -f ~/.bash_aliases ]; then
. ~/.bash_aliases
fi
# enable programmable completion features (you don’t need to enable
# this, if it’s already enabled in /etc/bash.bashrc and /etc/profile
# sources /etc/bash.bashrc).
if ! shopt -oq posix; then
if [ -f /usr/share/bash-completion/bash_completion ]; then
. /usr/share/bash-completion/bash_completion
elif [ -f /etc/bash_completion ]; then
. /etc/bash_completion
fi
fi
# disable Software Flow Control
stty -ixon
For the most part, this is a standard .bashrc file. The part that I find most helpful is the portion that shows me whatever git branch I’m on in the current directory (provided there is a git repo in the directory).
.vimrc
set nocompatible ” be iMproved, required
filetype off ” required
set number
set tabstop=4
set softtabstop=0 noexpandtab
set shiftwidth=4
set autochdir
set wildignore+=vendor/**,mail/**,runtime/**
let $BASH_ENV = “~/.bash_aliases”
syntax on
” set the runtime path to include Vundle and initialize
set rtp+=~/.vim/bundle/Vundle.vim
call vundle#begin()
” alternatively, pass a path where Vundle should install plugins
“call vundle#begin(‘~/some/path/here’)
” let Vundle manage Vundle, required
Plugin ‘VundleVim/Vundle.vim’
” Color scheme
Plugin ‘morhetz/gruvbox’
” File Tree
Plugin ‘scrooloose/nerdtree’
” Search files
Plugin ‘ctrlpvim/ctrlp.vim’
” Install ripgrep as well (https://github.com/BurntSushi/ripgrep)
Plugin ‘dyng/ctrlsf.vim’
” Multi-cursor support
Plugin ‘terryma/vim-multiple-cursors’
” Surrounding tags
Plugin ‘tpope/vim-surround’
” Upgraded status line
Plugin ‘itchyny/lightline.vim’
” Syntax checks
Plugin ‘vim-syntastic/syntastic’
” Git
Plugin ‘tpope/vim-fugitive’
” auto-complete
Plugin ‘Valloric/YouCompleteMe’
” All of your Plugins must be added before the following line
call vundle#end() ” required
filetype plugin indent on ” required
” To ignore plugin indent changes, instead use:
“filetype plugin on
”
” Brief help
” :PluginList – lists configured plugins
” :PluginInstall – installs plugins; append `!` to update or just :PluginUpdate
” :PluginSearch foo – searches for foo; append `!` to refresh local cache
” :PluginClean – confirms removal of unused plugins; append `!` to auto-approve removal
”
” see :h vundle for more details or wiki for FAQ
” Put your non-Plugin stuff after this line
colorscheme gruvbox
set background=dark
” Python path (required for autocomplete plugin)
” let g:python3_host_prog = ‘c:\\Users\\dylan\\AppData\\Local\\Programs\\Python\\Python37-32\\python.exe’
set encoding=utf-8
” Auto start NERDtree
autocmd vimenter * NERDTree
map <C-k> :NERDTreeToggle<CR>
autocmd BufEnter * if (winnr(“$”) == 1 && exists(“b:NERDTree”) && b:NERDTree.isTabTree()) | q | endif
let g:NERDTreeNodeDelimiter = “\u00a0″
let g:NERDTreeShowHidden = 1
” search settings
let g:ctrlsf_default_root = ‘project’
let g:ctrlsf_position = ‘bottom’
let g:ctrlsf_default_view_mode = ‘compact’
let g:ctrlp_custom_ignore = {
\ ‘dir’: ‘vendor\|.git\$’
\}
” code quality
set statusline+=%#warningmsg#
set statusline+=%{SyntasticStatuslineFlag()}
set statusline+=%*
let g:syntastic_always_populate_loc_list = 1
let g:syntastic_auto_loc_list = 1
let g:syntastic_check_on_open = 1
let g:syntastic_check_on_wq = 1
” status line config
set noshowmode
let g:lightline = {
\ ‘active’: {
\ ‘left’: [ [ ‘mode’, ‘paste’ ],
\ [ ‘gitbranch’, ‘readonly’, ‘filename’, ‘modified’ ] ],
\ ‘right’: [ [ ‘lineinfo’ ], [’absolutepath’] ]
\ },
\ ‘component_function’: {
\ ‘gitbranch’: ‘fugitive#head’
\ },
\ }
” YouCompleteMe Options
let g:ycm_disable_for_files_larger_than_kb = 1000
” autoinsert closing brackets
“inoremap ” “”<left>
“inoremap ‘ ”<left>
“inoremap ( ()<left>
“inoremap [ []<left>
inoremap { {}<left>
inoremap {<CR> {<CR>}<ESC>O
inoremap {;<CR> {<CR>};<ESC>O
” nvim terminal options
” To map <Esc> to exit terminal-mode: >
:tnoremap <Esc> <C-\><C-n>
” To use `ALT+{h,j,k,l}` to navigate windows from any mode: >
:tnoremap <A-h> <C-\><C-N><C-w>h
:tnoremap <A-j> <C-\><C-N><C-w>j
:tnoremap <A-k> <C-\><C-N><C-w>k
:tnoremap <A-l> <C-\><C-N><C-w>l
:inoremap <A-h> <C-\><C-N><C-w>h
:inoremap <A-j> <C-\><C-N><C-w>j
:inoremap <A-k> <C-\><C-N><C-w>k
:inoremap <A-l> <C-\><C-N><C-w>l
:nnoremap <A-h> <C-w>h
:nnoremap <A-j> <C-w>j
:nnoremap <A-k> <C-w>k
:nnoremap <A-l> <C-w>l
” don’t show warning on terminal exit
set nomodified
This file is the entire reason I started tracking my .dotfiles. Being able to effortlessly pull down my programming environment makes switching to a new computer so much simpler. Most of this file concerns the installation of various Vim plugins using Vundle but there are a few keyboard shortcuts as well. I’ll save preaching about Vim for another post.
Vim in action
install.sh
#!/bin/bash
ln -sf ~/.dotfiles/.bashrc ~/.bashrc
ln -sf ~/.dotfiles/.vimrc ~/.vimrc
ln -sf ~/.dotfiles/.bash_aliases ~/.bash_aliases
# php
sudo add-apt-repository ppa:ondrej/php
sudo add-apt-repository ppa:jtaylor/keepass
sudo apt-get update
sudo apt-get install -y python3 curl wget software-properties-common ansible vim vim-gtk3 git ripgrep build-essential cmake wireguard php7.4 php7.4-curl php7.4-gd php7.4-json php7.4-mbstring php7.4-xml keepass2 imagemagick neovim vim-nox python3-dev
# neovim
echo “set runtimepath^=~/.vim runtimepath+=~/.vim/after” >> ~/.config/nvim/init.vim
echo “let &packpath = &runtimepath” >> ~/.config/nvim/init.vim
echo “source ~/.vimrc” >> ~/.config/nvim/init.vim
# composer
# double check if hash has changed
php -r “copy(‘https://getcomposer.org/installer’, ‘composer-setup.php’);”
php -r “if (hash_file(‘sha384’, ‘composer-setup.php’) === ‘e5325b19b381bfd88ce90a5ddb7823406b2a38cff6bb704b0acc289a09c8128d4a8ce2bbafcd1fcbdc38666422fe2806’) { echo ‘Installer verified’; } else { echo ‘Installer corrupt’; unlink(‘composer-setup.php’); } echo PHP_EOL;”
php composer-setup.php
php -r “unlink(‘composer-setup.php’);”
sudo mv composer.phar /usr/local/bin/composer
sudo chown root:root /usr/local/bin/composer
While my .vimrc is what convinced me to start a .dotfiles repo, the install.sh is by far the most useful file in the entire project. When this file is run, the first thing it does is connect my .bashrc, .vimrc, and .bash_aliases to my profile. It will then add a couple of repositories, update the repositories, and install most everything I need to get up and running. Whenever I find myself installing another useful package on my machine, I try to remember to add it here as well so that I’ll have it in the future. After the installation of commonly used packages, I’ll setup Neovim and download composer for PHP dependency management. Interestingly enough, this process always breaks because I never have the correct hash to compare the updated composer.phar file to.
README
While this may not seem important, I can assure you that it’s the most important file in the entire repository. My README file tracks changes, documents proper installation techniques, and gives me a heads up about any quirks I might run into. You will always appreciate having documentation later so take the time to keep up with this one.
Conclusion
Managing a .dotfiles repository is by no means a one-off project. It’s an ever-changing entity that will follow you wherever you go and be whatever you need it to be. Use it as you need it, but if you take care of it, it will take care of you. You’ll thank yourself later on for putting in the work now. For more information, check out http://dotfiles.github.io/ or do some quick searching on the interwebs to find tons of other examples.
The one thing that you should absolutely be doing routinely is backing up your stuff. Yet you’ll notice in my previous post about using Ansible to automate my homelab, there is no mention of backing up the environment. If you’re wondering why that is, it’s because I am both lazy and forgetful.
Having been bitten one too many times by my fancy automated updates, I decided I’d had enough. I was spending too much time connecting to the Proxmox web GUI, starting a backup, then running updates so if (when) things broke, I’d have access to a more recent backup. I needed to be able to take backups within Ansible as well as run my updates.
This is the solution I came up with:
—
– hosts: host
remote_user: root
vars_prompt:
– name: ctid
prompt: ‘Specify container ID or leave blank for all’
private: no
tasks:
– name: Backup all containers.
command:
cmd: vzdump –all –maxfiles 5 –compress gzip
when: ctid == “”
– name: Backup specified container.
command:
cmd: vzdump {{ ctid }} –maxfiles 5 –compress gzip
when: ctid != “”
This playbook should be easy enough to understand without too much exlaining but I’ll sum it up: if a container ID is specified when run, use the Proxmox tool vzdump to backup that container; otherwise, backup all containers (compress those files and only keep the most recent 5). Please borrow, tweak, share, and critique.
I’ve been in the market for a new laptop since the battery died on my secondhand Samsung. Even the replacement (aftermarket) batteries I found for it would only give me 2 hours of usage for the first month and then drastically drop off to 45 minutes. Having to hunt for an outlet everywhere I took it was so much of a nuisance that I couldn’t comfortably use it in my own living room.
So when I saw that System76 announced they were releasing a new laptop that claimed 14 hours of battery life, my mind was made up. I was going to have that machine.
Which brings us to this post. I’ve taken a new approach in an effort to brag share my first impressions with the world by creating videos. I’m well aware that the video quality isn’t great and that’s because I don’t know the first thing about video recording, editing, sound, light, etc. Also, I’m lazy.
Unboxing
Disassembly
System76 is kind enough to provide repair manuals but it’s really simple to get inside and gain access to various components.
Keyboard + Trackpad
The backlit keyboard has 4 different brightness settings as well as the capability of being shut off. The only real complaint I’ve had about the keyboard is that the space bar is so soft that I sometimes wonder if I actually hit it. The arrow keys are quite close together but if you’re doing most of your writing in Vim (I am), it’s not that big of a deal. The trackpad took some getting used to since I’m so used to having physical clickers but the two-fingered tap for right click is has worked really well.
Display
Being such a small form factor with an HD screen, it’s actually quite difficult to read some text. It may just be that my glasses prescription needs to be updated (it desperately does) but I kept finding myself having to bring the device closer to me so I could read it. I’m probably just getting old. In any case, it was an easy fix in the Pop Shell/GNOME accessibility settings. I’ve also turned up the interface size to 125% on applications like Telegram and increased the font size in Firefox to make it easier to read at a comfortable distance.
Battery
Having only had the laptop for a day, there’s not really much that I can say about the battery life yet except that it’s a huge step up for me. I’ve put around 6 hours of actual usage onto and it still has 55% battery left with an estimated 7 hours. During that time, I’ve updated the firmware, the packages, installed around half of the tools needed to do my day-to-day work, streamed music, written this post, cloned my dotfiles repo, and just played around with it.
Update (5/23/20): After using the Lemur Pro for a couple of weeks now, I’ve been averaging a little over 12 hours of usage. That typically includes running a VM for web development, a chat client, email, a browser with multiple tabs, and Vim. Going from less than 10% battery back to 100% typically takes about 5 hours. The only gripe with charging is that the charging cable is the very short. Fortunately, its simple enough to purchase a longer length of cable to use with the charger.
Pop OS
Pop OS 20.04 really steals the show on this machine. I did not expect to be as excited about it as I currently am. Having tiling functionality baked into GNOME with Vim keybindings really gives you the best parts of window managers like i3-gaps and gnome-shell. It’s easy to move between windows and workspaces. I never really used workspaces in GNOME before because it was just so awkward to drag and drop windows to a new location and get them setup how I wanted them. But with tiling built into the Pop Shell, I can use my trackpad to select a workspace or Super + Ctrl + H, J, K, or L to cycle through them. I’m not sure I’m the best person to do an in depth review of Pop OS so if you’re curious about it, you should read everything System76 has done with it. It works really well. I’ve not tried Regolith Linux but that project seems to attempt to solve similar problems that the Pop Shell has.
All of the extensions that come pre-loaded displayed on the gnome shell extensions website via the gnome shell extensions browser add-on.
Competition
As I said earlier, I did some shopping around before settling on the Lemur Pro. The most obvious competitor is the Dell XPS 13 Developer Edition but when I selected a model with similar specifications to this particular Lemur Pro, I was surprised to find that the Lemur Pro was cheaper than the XPS 13.
Granted, the Dell XPS comes with a higher resolution display but the battery life isn’t nearly what the Lemur Pro is and it doesn’t allow for multiple storage devices. It was a no brainer for me, because I also got to support a smaller US based company that is promoting free software.
I never in a million years would buy a Macbook Pro, but I was curious about the difference in price point and, well, I wasn’t surprised that it clocked in at more than $1000 than the Lemur Pro.
Obviously, Apple devices come with an experience that is fine tuned to their environment but I don’t know if I could justify spending so much when other quality options are available.
I had also considered a Surface Pro but unsurprisingly, it was also prohibitively expensive.
3 month update
After using the Lemur Pro for about 3 months now, I have noticed a few issues. The first and most notable being the Page Up/Page Down keys on the keyboard. Because of how often I use those buttons (default keybinding in GNOME terminal tabs), I find it difficult to correctly get to even the arrow keys. If you’ve got fat fingers, this could be a deal breaker for you.
Secondly, the System76 logo on the laptop is just a sticker, which makes sense when you think in terms of the laptop being a rebranded Clevo device. While some people might think this is a downside, it’s also means you can peel the logo off with a tweezers and some GooGone to get a completely nondescript black laptop.
And finally, I’ve noticed some strange issues with WiFi cutting out after resuming from suspend. This has only happened recently which makes me think it was an update that introduced the problem. I try to keep my systems as up to date as possible, but there’s always a chance that something will break in doing so. Hopefull, System76 can address it soon as this seems to be my number one usability issue so far.
For more reading, checkout what these fine folks had to say:
Lemur Pro Review
Unboxing the Lemur Pro
Beyond The Specs: These 2 New Linux Laptops Aren’t Created Equal
If you have questions about the laptop or would like to add some thoughts, leave a comment or contact me and I’d be happy to chat with you about it.
Categories
Bulk Image Compression via CLI
Occasionally, I like to share HD photos but they always end up tens of megabytes in size and large files can be a pain send to family and friends. To circumvent this, I make sure to do some image compression before ever sending the images. It’s also very helpful when posting images to a website as large files means longer load times for users (and users don’t like that). So when I wanted to add many photos to a blog post but didn’t want to resize and compress each file manually, I had to figure something else out. A quick search led me to this post that reminded me of the power of Imagick. I’ve used it in the past to generate thumbnails based on PDFs so I knew it had a command line interface but this trick takes it to a whole new level. You’ll need to install imagick (available from most package managers) but once done, the command looks like:
mkdir compressed;for photos in *.jpg;do convert -verbose “$photos” -quality 85% -resize 1920×1080 ./compressed/”$photos”; done
Running this command from the directory your images are located in will 1.) create a new sub-directory to add your compressed files to, 2.) run a for loop through all jpegs in the current director, 3.) create a new image file with the same name in the sub-directory with the dimensions of 1920×1080 pixels and compress it by 15%. This one command saved me so much time, I had time to write another post about it.